Set up AOMG IP camera for external monitoring
This setup was done with a specific IP camera: AOMG OG-IPC3J19P-I3(A), but it can easily be extended for any other similar IP camera. This particular one has a wired Ethernet interface, so it requires a physical ethernet cable to the router.
Physical connection
We're going for this kind of setup:
So, we need to connect the camera to a power outlet using its provided power adapter, and to the router via an Ethernet cable. Make sure it's CAT5 or better if it will be outdoors (this camera model is suited for outdoor use, so don't worry about that). To check that the camera has power, cover its lens with your hand and check if its red leds light up. It has no on/off switch, so that's the only wall to tell if it is on.
Local configuration
The first step is getting the camera's IP address; this is usually specified in the manual, but in case you misplaced it, or a power failure reset the camera's settings, the best way to discover it is using Angry IP Scanner; this will scan a range of IPs in your local network, and mark those which are associated to online devices. So, we will download Angry IP Scanner on your PC, connect it to the router with an Ethernet cable, and run a scan in order to find the camera's IP address.
Usually, routers are in the 192.168.1.0 or 192.168.0.0 network; keep in mind that *the router and the camera must be in the same network* for this to work. If they are not (router in 192.168.0.1 and camera in 192.168.1.x, for example) you will have to change IP address for one of them; usually, changing the router is easier. So, assuming both devices are in the 192.168.1.0 network, we can discover the camera's address by searching from 192.168.1.0 to 192.168.1.255 with Angry IP Scanner. After scan is done, sort the results by name; you will see something like this:
One of the blue IP addresses corresponds to the camera; therefore, try them out in Internet Explorer (yes, this camera uses ActiveX, so you will need IE for local monitoring), until you see the web client interface:
For this camera, default user and password are both "admin". When accessing this page, Internet Explorer will ask to install an ActiveX control so allow it, and refresh the page. You should now be able to view the camera live:
You can use this web interface to adjust the camera position and settings; once you have it setup the way you like it, we can proceed with making the camera feed visible outside your local network.
Exposing across Internet
So, we discovered the camera's IP address, but it's a private IP address: it is only accesible inside your local network. So, we have to perform additional setup steps in order to access from outside. First of all, we need to setup a DMZ (demilitarized zone) or Virtual Server in the router so that all or certain external requests are forwarded to the IP camera. If the IP camera is the only device you want to expose, DMZ is simpler and enough for this goal; however, if there is another device exposed or to expose, a virtual server will be the alternative. Setting this up is different for each router; we will show it for a specific router (Askey RTV9015VW).
Setting up DMZ only requires setting the DMZ host IP address to the camera's address; assuming it's 192.168.1.33, you should set it this way:
Setting up a Virtual Server will require mapping ports;for the external port you can use any value you want, but the local port will have to match the one used by the camera for RTSP. By default, AOMG uses the 554 port (you can change it in the settings interface). So, yo example, if you were to use 554 as external port too, the entry would look like this:
This will map any requests to the router's public address and port 554 to the IP camera. If you need to set up more than one camera, you will need a similar virtual server rule, with a different external port. In short: for a single CAM and no other device to expose, use DMZ; otherwise, use Virtual server rules. Also, consider that a router reset might be necessary for these settings to take effect.
Accessing the live feed
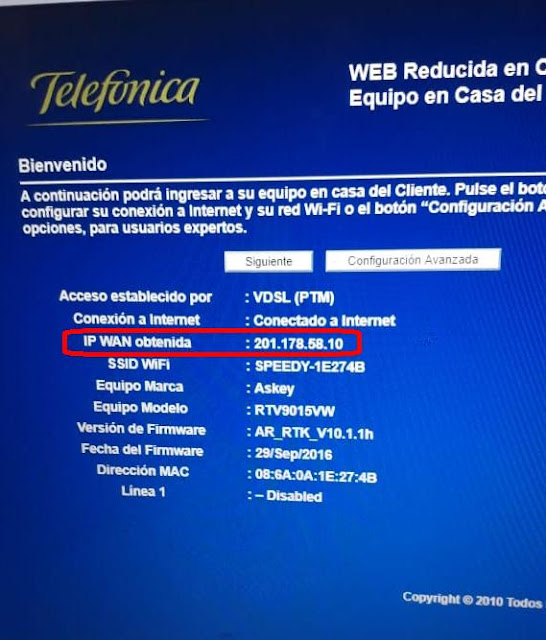
Now that the external access is set up, the final step is getting the router's public IP address and using it to get the camera live feed. The first step is easy; just enter the router config page and you'll see it:
Finally, to view the feed, the easiest way is using VLC media player, on mobile or desktop version. For mobile, tap the menu and select Stream (on desktop, Media - Open network stream):
When you tap "Stream", VLC will ask for a network address; assuming the router's IP address is 201.178.58.10, then the feed address is: rtsp://201.178.58.10/ucast/11
Don't expect a good frame rate if viewing on mobile data; ideally, use a WiFi network.


Thanks for share this interesting blog post with us. Home security is first priority of every home. I suggest wireless burglar alarm to protect your home, property and family. You can monitor your home premises 24/7 every minutes from your smartphone. Its helpful for everyone.
ReplyDeleteThis is useful and awesome detailed blog
ReplyDeleteThanks for shaing and visit us
security camera red deer